Connecting To QuickBooks
U.S. QuickBooks 2005 and Later and CA/UK QuickBooks 2008 and Later
For security purposes, QuickBooks Integrated Applications such as this one cannot connect to a QuickBooks company file until you have set the Integrated Application Preferences within the QuickBooks file to allow the connection. To set these preferences: (Note, you will need to do this for both the source and destination companies)
- Start QuickBooks and open the source company that you want to export data from.
- On the main screen of this program, erase (blank out) whatever is in the “Source Company” field.
- Click the “Open Source Company” button on this programs main screen and a QuickBooks screen like the one show below will pop up.
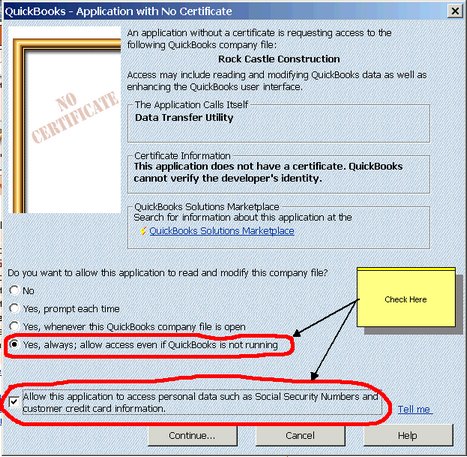
Click the two boxes shown above circled in red. Then click the Continue button. Click "Yes" on the digital certificate warning screen and then click "Done" on the Confirmation screen. This should return you to the Data Transfer Utilities main screen.
4. On the Utilities main screen click the "Close" button on row 3.
5. Return to QuickBooks and open the Destination company that you want to import data into.6. On the main screen of this program, erase (blank out) whatever is in the “Destination Company” field.
7. Click the “Open Destination Company” button on this programs main screen and a QuickBooks screen like the one show previously will pop up.8. Click the two boxes shown above circled in red. Then click the Continue button. Click "Yes" on the digital certificate warning screen and then click "Done" on the Confirmation screen. This should return you to the Data Transfer Utilities main screen.
9. On the Utilities main screen click the "Close" button on row 3
9. In QuickBooks, click File>Close company. This leaves you with a box in the middle of the QuickBooks screen that says "No Company Open". Now you can open and close the source and destination companies using the "Open Source Company" and "Open Destination Company" buttons on the main screen of the transfer utility.
U.S. QuickBooks 2002 to 2004 and CA, UK and AU QuickBooks 2003 to 2007
Connecting to QuickBooks Company
File the First Time
For security purposes, QuickBooks Integrated Applications such as this one cannot connect to a QuickBooks company file until you have set the Integrated Application Preferences within the QuickBooks file to allow the connection. To set these preferences: (Note, you will need to do this for both the source and destination companies)
- Start QuickBooks and open the source company that you want to export data from.
- On the main screen of this program, erase (blank out) whatever is in the “Source Company” field.
- Click the “Open Source Company” button on this programs main screen and a QuickBooks screen like the one show below will pop up. (These screens below are from QuickBooks 2002. Screens for 2003 are similar.)
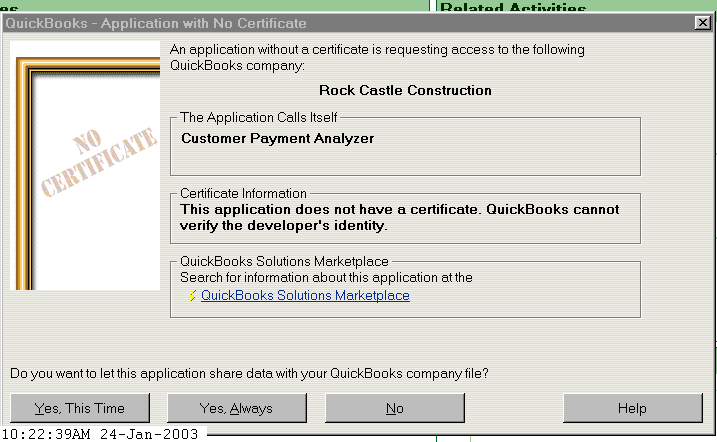
Click the Yes, Always button and the following screen will popup. ( Note that you can always change this answer by going to Edit>Preferences>Integrated Applications while in your QuickBooks company. )
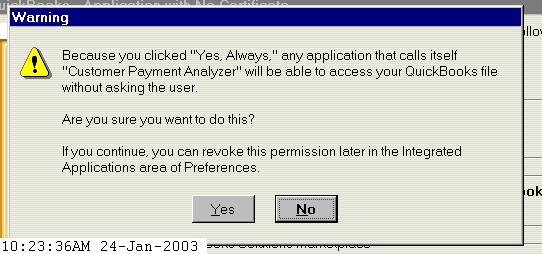
Click the Yes button and you will be returned to this programs main screen where you can do the same thing for the destination company.
Automatically
Connecting To QuickBooks
After you have connected to QuickBooks the first time using
the procedures described above, you can change the preferences in QuickBooks to
allow this program to connect to your QuickBooks company whether QuickBooks is
running or not. This is referred to as "Automatic Login". The main benefit of
automatic login is that you can switch between the source and destination
company simply by clicking a button
on this programs main screen. You don’t have to go to QuickBooks and close one
company and open the other company. Use the following procedures to set up
automatic login:
- Start QuickBooks and open your source company.
- Click Edit>Preferences>Integrated Applications and you should see a screen like that shown below.
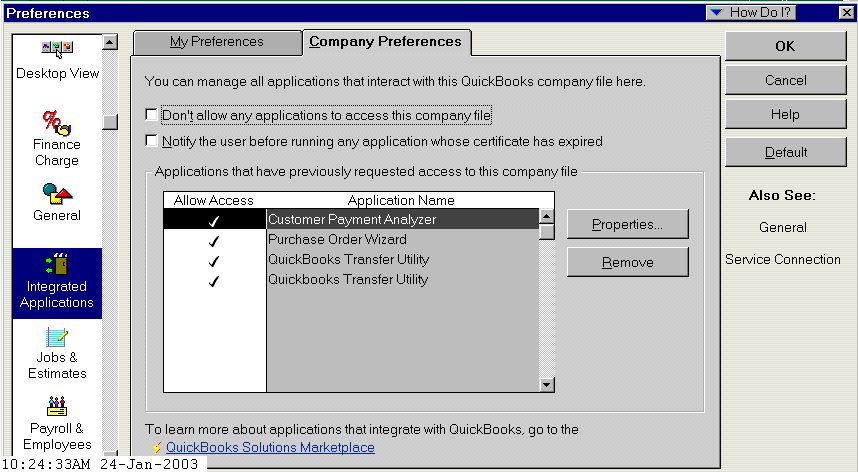
Click the Company Preferences tab and highlight this application. Click the Properties button and the following screen will popup.
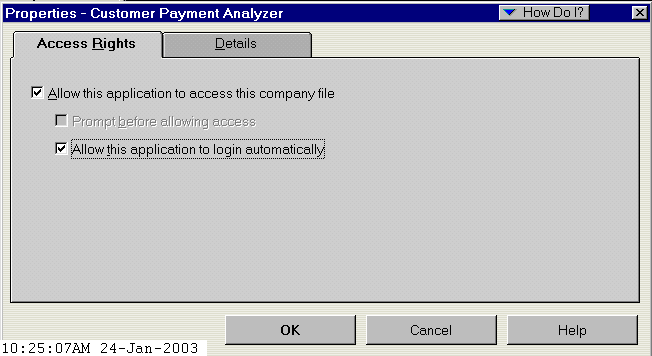
Check the “Allow this application to login automatically” box on the Access Rights tab. If there is a Login as box just below this box, choose a user that has access to all areas of QuickBooks from the drop down list. Then click the OK button twice to return to the regular QuickBooks screen.
For more detail on connecting to QuickBooks, click on the Help Files link below and click on the "Connecting To QuickBooks" topic.